
Printing
Print Project
Overview
- Print Project subcategories include:
- Spec Book
- Contains all of the print settings for both the individual Spec Sheets and the printing of Spec Books.
- Budget Reports (COMING SOON)
- Contains three budget reports: Budget with Items, Budget Summary, Budget by Room Type.
- Custom Reports
- Contact Specsources to quote Report Customizations.
- Other Reports
- Access the Other Reports page to review a variety of types of standard Reports. ie. Issue Date report, Matrix reports, Revision Date report, Schedule by Locations.
- Print Log
- Subcategory which displays a history of past printings of pdfs or excel documents available for future downloads.
QUICK TUTORIAL
PRINT A SPEC BOOK
Project Spec Books can be printed two different ways, from the Dashboard or from the Spec Schedule.
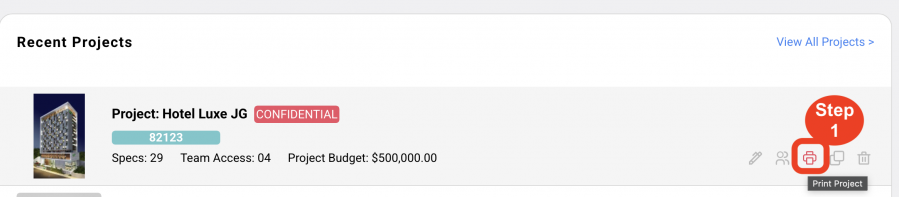
- Step 1: From the Dashboard, mouse over the project and click the Print icon.
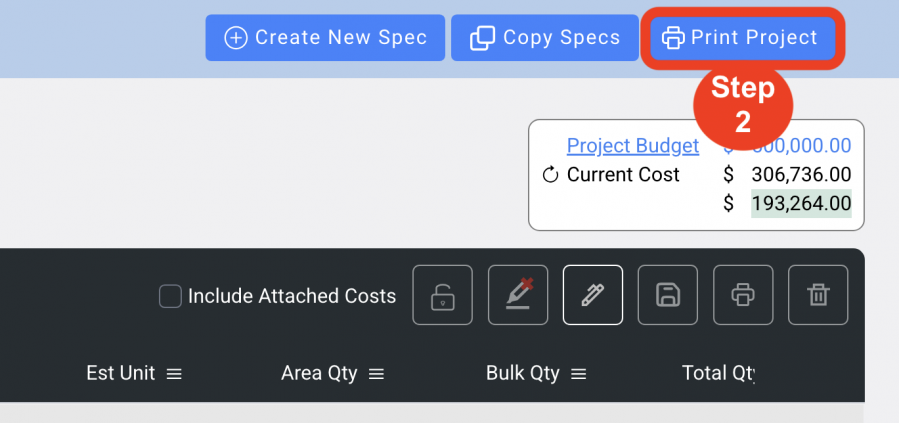
- Or Step 2: From the Spec Schedule, click on a project in the dashboard, then click on the Print Project button at top right.
Upon opening the Print Project window:
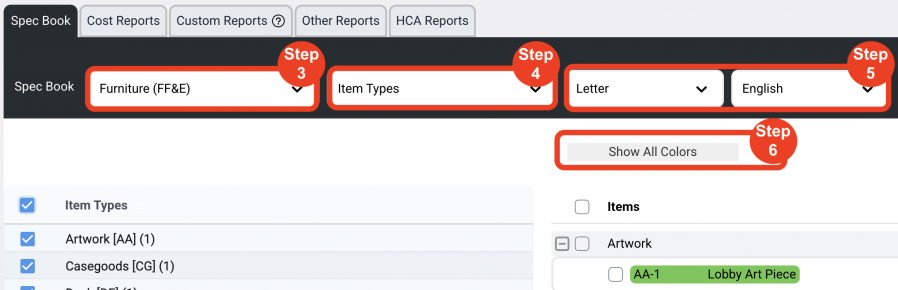
- Step 3: Select Specification Type
- This dropdown will show all Specification Types in this Project.
- Specification Types generate separate Spec Books and cannot be combined.
- Step 4: Select Print By
- This populates the first grid. Select one or multiple Print By options from the dropdown. This will group your specs by that selection.
- Alphanumeric Order
- Item Types
- Areas
- Rooms
- Manufacturers
- Vendors
- Issue Dates
- Revision Dates
- Furnished By / Installed By
- Step 5: Page Size and Language
Click on the dropdown to choose the page size.
Click on the other dropdown to choose which language should the report print in. - Step 6: Show Item Color
- Checking this will show a colored band if that Item was assigned a color status in the Spec Schedule.
- The Items list can show all, none, or individual colors.
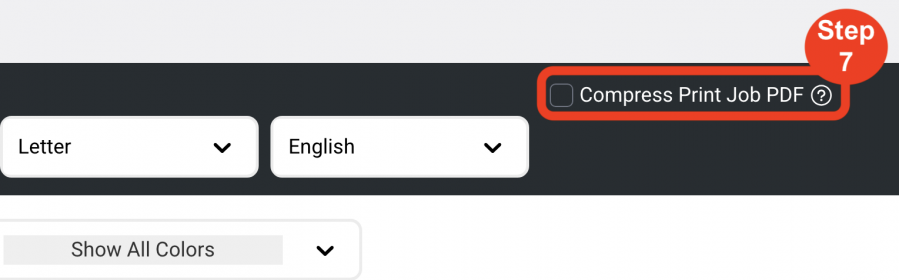
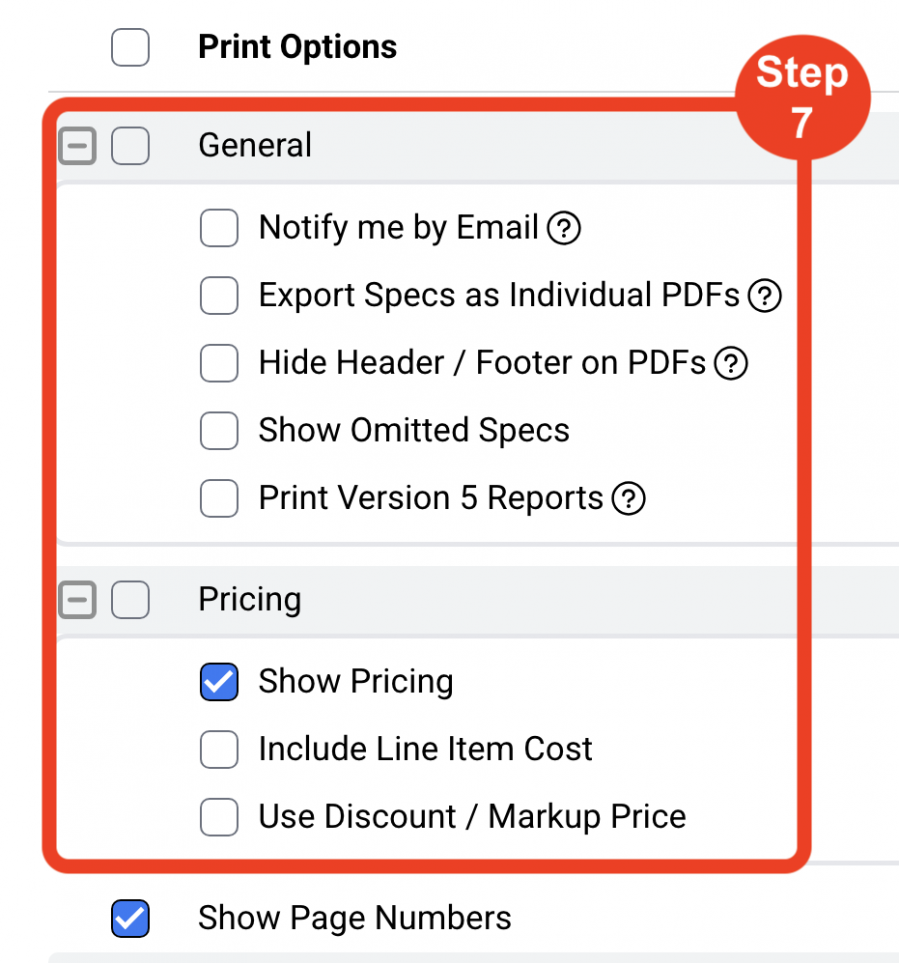
- Step 7: Other Options
Compress
Checking this will compress the selected Report to a smaller size and quality, affecting image quality.
Notify me by email
Checking this will notify when the print is completed by email.
Export Specs as Individual PDFs
This option gives the ability to export each Specification as a separate PDF file.
Hide Header / Footer on PDFs
Headers / Footers are automatically added to PDFs but can be removed if the User does not want to scale down the PDFs.Checking this box will remove the header and footer from printing on the PDFs so that a scaled drawing can be printed to scale.
Show Omitted Specs
Checking this will show all Specs that have been tagged as ‘Omitted’ on the Spec sheet. Checking this box will display those Spec Sheets that have been tagged as ‘Omitted’ so that they can be included in the Spec Book printing if desired. The checkbox to Omit a spec is located on the Spec Sheet. Click the edit icon next to the Control # on the Main Page of the Spec Sheet.
Show Pricing
Checking this will show costs on individual Spec Sheets and on the Items Report.
Include Line Item Cost
Checking this includes the Line Item cost for the Items.
Use Discount / Markup Price
Checking this will show the discount and markup prices for the Items.
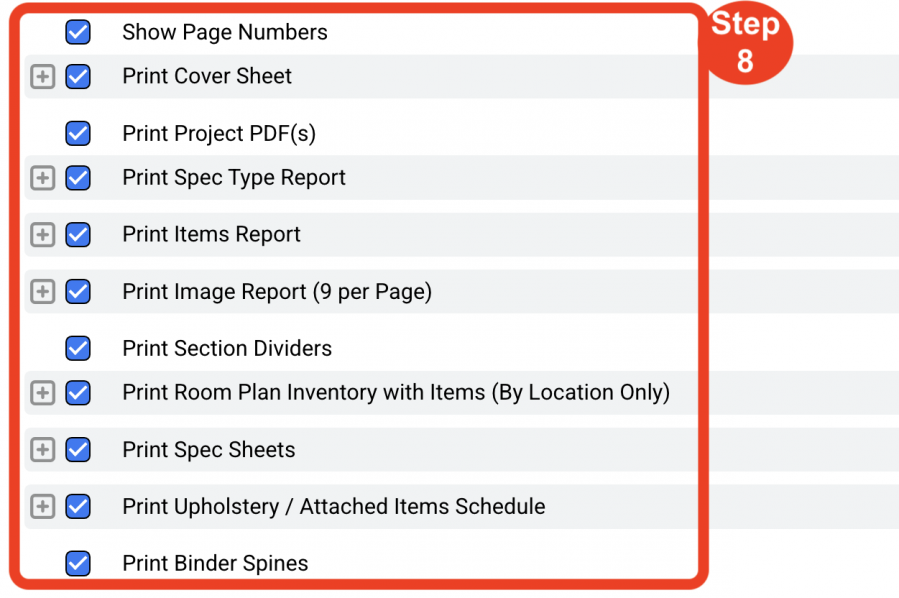
- Step 8: Confirm Print Options Settings
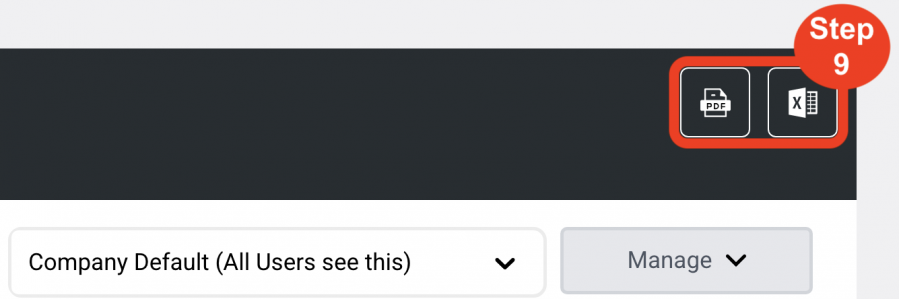
- Step 9: Click on Generate PDF or Generate Excel
PRINTING OPTIONS:
Set Company Default Print Options
Access Level: Super Admin
- A Company Default setting is available as a company-wide print setting. Only the Super Administrator has the access level to create and modify these print settings.
- By setting company default options there is greater consistency of Spec Book printing from user to user.
Set Personal Print Options
Access Level: All Access Levels
- Individual Designers / Users can create their own custom print settings which are only accessible on the user’s computer.
- This will eliminate the task of reselecting the print options for each Spec Book printing.
- Users can also set a personal print setting as the Default Setting.
SETTING UP PRINT OPTIONS:
In order to print Spec Sheets and Spec Books, Printing Options selections must be selected under the Printing Options display dropdown.
Printing Options Dropdown:
- Company Default
- Company Default 2
- Custom print settings by users (Optional)
Create a new print setting
- Type the name of the new print setting directly in the field ‘Company Default’.
- In the grid below, select the desired printing option check boxes.
- Click the ‘Manage’ button.
- Select ‘Add Options Set’.
- The new print setting name will now appear in the Print Options dropdown
Change the name of an existing Print Option setting
- Type the new name of the print setting directly over the existing name in the dropdown field
- Select the desired printing option check boxes
- Click the ‘Manage’ button
- Select ‘Update Options Set’
- The new print setting name will now appear in the Print Options dropdown
Delete a Print Option Set
- Select the print option from the dropdown
- Click on the ‘Manage’ button
- Select ‘Delete Options Set’
- This will remove that option from the dropdown list
Create a Default Print Option Selection
- Select the print option desired to be the default from the dropdown
- Click on the ‘Manage’ button
- Select ‘Set as Default’
- When the Print Project button is clicked in the application, the window will automatically open to the default print setting in the dropdown list
PRINT OPTIONS CHECK BOXES:
- Show Page Numbers
Prints the page number in the lower right corner on every page of the Spec Book. - Print Cover Sheet
Prints the Cover Sheet at the beginning of the Spec Book. The Cover Sheet includes:- Office Logo (Spec Sheet-Main Page)
- Project Name (Create New Project)
- Project Address (Create New Project)
- Project # (Create New Project)
- Issue Date (Create New Project)
- Revision Date (most recent) (Project-Spec Schedule)
- Cover sheet image (Project–Spec Schedule-Project Info)
- “Print By’ Listing
- Print Project PDFs
Prints uploaded Project PDFs which will print immediately following the Cover Sheet. (Project–Spec Schedule-Project Info) - Print Spec Type Report
Prints the Spec Type report in the Spec Book before the Spec Sheets. This report is an overview of all the items in the project. The items in the Spec Type report are grouped the same way as the items in the Spec Book based on the ‘Print By’ options that were selected.
The Spec Type report can be printed two ways:- Portrait (Default)
- Landscape (Optional)
- Control #
- Description
- Show Areas / Rooms (Optional)
- Show Quantity (Optional) (Optional)
- Show Attached Items below Item (Optional)
- Show Manufacturer Source (Optional)
- Show Vendor Rep (Optional)
- Show Item Specia Instructions (Optional)
- Print Landscape (Optional)
- Show Images (Primary Spec Sheet Image – Optional)
- Print Items Report
This report lists all the items in a project grouped by the Print By’ selection.
Included columns:- Control #
- Item Name
- Item Cost
- Total Cost
- Revision Date
- Total Qty (Optional)
- Unit (Optional)
- Print Image Report (9 per page)
This report displays the primary Spec Sheet image in a grid of 9 images per page.- Show Item Name underneath the image (Optional)
- Show Attached Items below Item (6 per page) displays the attached items underneath the item (Optional)
- Print Section Dividers
This option creates a title page for the different Print By sections. ie. Print By Item Type will create title pages for each of the different Item Type sections of the Spec Book. - Print Spec Sheet
These check box settings control what is displayed or not displayed on the individual Spec Sheets. These should be carefully reviewed and saved as print settings to achieve the desired information on the Spec Sheets.- Show Manufacturer Source – Displays the Manufacturer Source on the Spec Sheet.
- Show Vendor Rep – Displays the Vendor Rep on the Spec Sheet.
- Show Special Instructions – Displays both the Project Special Instructions and the Item Special Instructions if they exist.
- Show Lead Time – Displays the lead time.
- Show Quantity – Displays the Area, Bulk and Total Quantity.
- Show Furnished By / Installed By – Displays either: Contractor, Owner, Purchaser, Hotel.
- Show Areas – Displays the Area Names.
- Show Rooms – Displays the Room Names.
- Show Room Types – Displays the Room Type Names.
- Show Room Quantity – Displays the Room quantity only.
- Print Additional Image Pages.
- Print Upholstery / Attached Items Cross Reference – Displays a thumbnail image with control# and item name of the Upholstery / Attached items.
- Print Item PDFs.
- Print Upholstery / Attached Item Spec Sheets – Displays the Upholstery Spec Sheets after Upholstery / Attached Items Cross Reference.
- Print Item Cross References - Displays a thumbnail image with control# and item name of the regular items that have attached items to them.
- Print Upholstery / Attached Items Schedule
Displays a list of all the Upholstery and the Items attached to them. - Print Spines
Prints 2” wide spines for physical Spec Book binders.
