SpecBIM
OVERVIEW
The SpecBIM Revit Add-On is an additional product that can be purchased through Specsources which allows for the passing of data from the Revit model into Specsources’ SpecWeb application. It is primarily used to pass Areas, Rooms and Quantities. However, additional information such as Room Types, Descriptions and Notes can also be passed.
QUICK TUTORIAL
SpecBIM Tutorial
ABOUT THE ADD-ON
- Can be installed on unlimited computers.
- Compatible with Revit versions 2021 – 2025.
- SpecWeb and the Revit model can be worked in simultaneously. A designer/architect can be working independently in the Revit model, tagging items, while a designer is creating specifications in SpecWeb.
- The tagging of furniture or items in the Revit model must match the Spec Sheet item numbering configuration exactly as created in SpecWeb > Spec Type > Config page.
- Data synchronization occurs by passing Areas, Rooms and Quantities from the Revit model into SpecWeb and automatically populating these fields in the Areas / Rooms page.
- A designer writing specs in SpecWeb should not manually enter Areas, Rooms and Quantities.
INSTALLATION
OVERVIEW
A Revit Add-On Installer has been created by Specsources and is accessible via SpecWeb > Dashboard > Left Navigation > SpecBIM. A subscriber is responsible for running the installer on each user’s computer that has Revit installed.
Install SpecBIM
- Step 1: Close Revit before beginning this process.
- Step 2: Go to your Specsources' account.
- Step 3: Click on 'SpecBIM' in the Left Navigation Panel.
SYNC DATA FROM THE REVIT MODEL INTO SPECSOURCES
- Step 1: Create a project in SpecWeb. This is a necessary pre-requisite in order for the Revit Add-on to be able to recognize the project in SpecWeb that data will be passed to.
- Step 2: Open the Revit file.
- Step 3: Go to Add-Ons > click on the ‘Specsources’ tab
(Screen shot of tab)
(Screen shot of icons ribbon)
- Step 4: Click on ‘Set Up’ icon.

- Step 5: Specsources – Token: Click on the link ‘Get the token code here’
Copy the Specsources Token from step 13 in the installation instructions and paste into the field provided. This is a one-time step.
- Step 6: Click on the ‘Validate’ button. This then allows the user to see the list of Specsources projects in the next drop down.

USING THE REVIT ADD-ON
OVERVIEW
In order to sync data from the Revit model into Specsources, there are two primary icons that are used:
- Set Up – Establishes the linked files and parameters of information to be passed into Specsources. Once the selections in the Set Up window are completed, the selections will remain, and no further input is required.
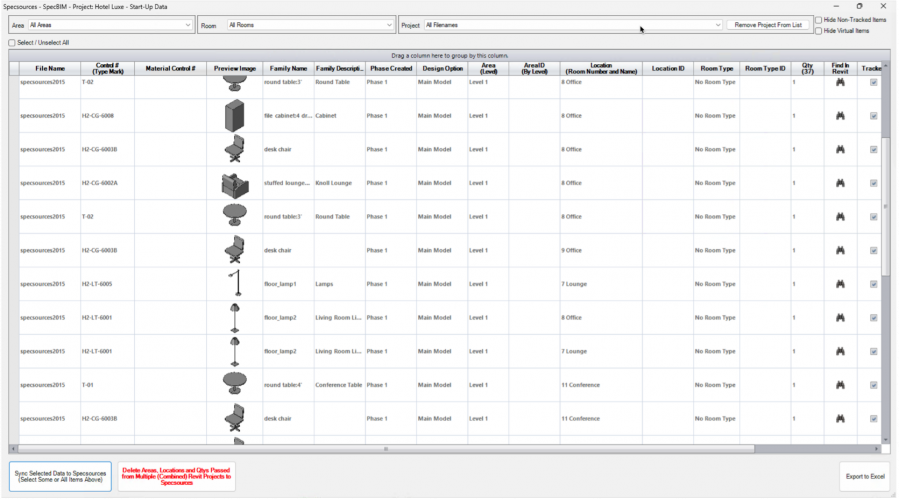
- Sync Data – Allows for the selection of specific items and descriptions to be passed into Specsources. The Sync Data icon is used every time information must be passed from the Revit model into Specsources.
Other optional function icons within the Revit Add-on include:
- Export Room PDFs – Enables the creation of a Key plan with room plan and item inventory by room.
- Room Types and Virtual Copies – Enables the ability to work with room types identified in the Revit model and sync item quantities into Specsources.
- Item Info
- Labels to Properties
SYNC DATA FROM THE REVIT MODEL INTO SPECSOURCES
- Step 1: Create a project in SpecWeb.
Important Facts: A project must exist in Specsources and Items must be tagged in the Model before they can be synched from the Revit add-on.
- Step 2: Open a Revit file. Click on the ‘Specsources’ tab (Add screenshot)
- Step 3: Click on ‘Set Up’ icon. (Add screenshot)
Token field?
- Step 4: Select a Specsources project from the dropdown to pass data to.
- Step 5: View Existing Specs that were created in SpecWeb (Optional)
- Step 6: Select Linked Files as required. More than one linked file can be selected.
- Step 7: Map Specsources Fields to Revit Parameters. Typically:
- Specsources: Control # maps to Revit: Typemark
- Specsources: Area maps to Revit: Level
- Specsources: Room maps to Revit: Room Name
- Specsources:
- Step 8: Confirm / Select Revit Families. Furniture and Furniture Systems are preselected by default.
 Place holder (new screenshot)
- Step 1: Specsources – Select a Specsources Project to pass Revit data to: Select a project from the drop down to pass data to. (add the word ‘a’ and remove apostrophe after Specsources)
- Step 2: Click on ‘View Specs’ button to view existing specs that were previously created in SpecWeb. (Optional)

- Step 3: Map Specsources’ Fields to Revit Parameters: This enables the user to create a global list of parameters to be used on any item, regardless of Item Type.
- Map Labels: Allows the user to select any Revit Parameter to be passed into Specsources’ Label fields. (Not recommended because……)
- Click in the ‘Select Revit Parameters’ field to display a pop-up window.
- To view the standard parameters contained within Revit click on the drop down.
 | |||
 | |||
- To create Custom Parameters, type in the dropdown field, click ‘Add’ to make it visible in the white box. Click ‘OK’ to add these parameters to the master list. This information in Revit can now be passed to the corresponding spec sheet Label fields in Specsources.

Should the word Notes be Labels?
- Map Families: Click on ‘Select Families to Track’ in order to……
- Confirm / Select Revit Families.

Important Fact: DO NOT use this option if you use Free Text for the Control Numbers

?????
- Furniture and Furniture Systems are preselected by default. However, any Revit Family can be selected and tracked. Click ‘OK’.

- Typical Mapping for passing data from the Revit Model to Specsources:
There are parameters that pertain to Instances and parameters that pertain to Families.
SPECSOURCES FIELDS REVIT PARAMTERS
Control # maps to Type Mark (Recommended)
Area maps to Level (Recommended)
Room maps to Room Name (Recommended)
Important Fact: Specsources does not support the use of Free Text with the Revit Add-on.

- ‘Area ID’ maps to the corresponding selection of ‘Area’. There are only two options. By Area or By Level. These are created in Revit. See example below. This will populate the Area Code column in Specsources.
- Typical Mapping to pass Revit room #s into Specsources’ Room ID column: Select the check box adjacent to the ‘Room Name’ drop down.

- Map Room Types. Select the the check box ‘Read Room Types from Revit Parameters’.

- Type the parameters in each corresponding field. This activates fields to access Room Types and Room Type IDs that were created in the Model for the Rooms. For example:

- The Parameters are created in Revit first. Go to Project Parameters in Revit. Then the Room type and Room Type ID can be entered in Revit.


Step 4: Materials:

- Step 5: Specsources – Linked Revit Files with Rooms:
- Select check box to ‘Use Rooms in Linked Revit files for Item Location Tracking’. This feature enables loaded linked Revit files to be scanned in order to look for Revit elements that should be passed to Specsources and aggregated by the previously defined Area and Room.
- Select a linked File with room definitions from the drop down as required. More than one linked file can be selected.
- Click on ‘Add another File’ in order to add more linked files for selection purposes.


- Step 6: Specsources – Setup Options: Click on the ‘Options’ button to display additional option settings.

 | |||
- Project Options: This is a default option setting which combines item Qtys from multiple Revit projects.
- Sync Grid Options: These options enable the hiding of function buttons or columns in the Sync Grid
- Menu Options: These are options within the….
- Control # Setup: These options are required if the control #s in SpecWeb are using either Item Type codes in the Suffix or using Item Type Series #s.
- ‘Exclude Contol #s’: This button…
- Other Options: These options are required if there are linked files that need to be synced.
- Step 7: Specsources – About: This pop-up

- Step 8: Click ‘OK’ button.

